Unite Gallery
general purpose responsive gallery jquery plugin
- created: 06/20/2014
- by: valiano
- email: web.power.net@gmail.com
Licence
This item brought under MIT license. It means that you can use it in every project of yours freely.
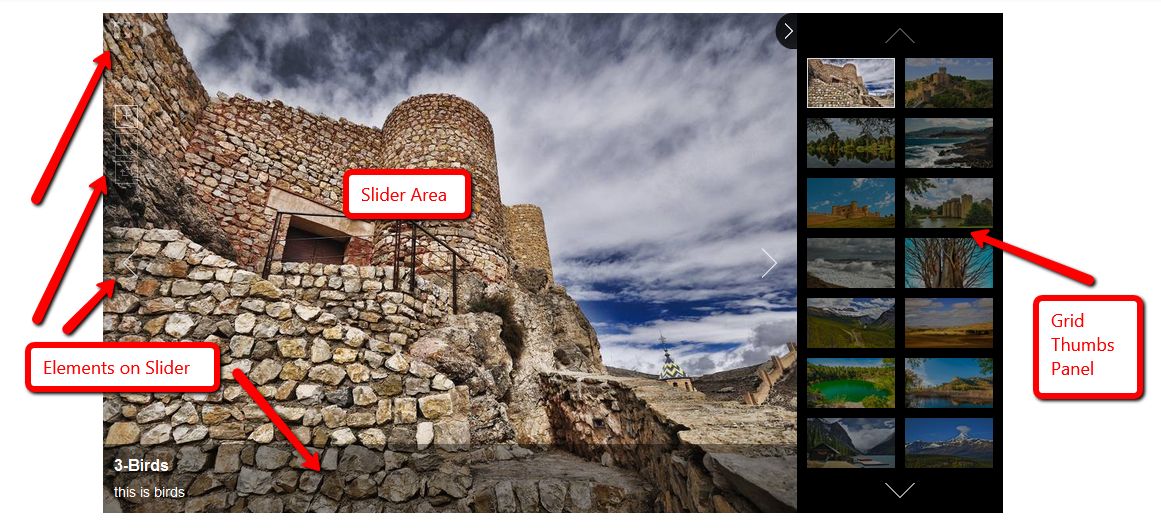
Gallery Structure
Each gallery theme could use different gallery elements. Every one have a slider (it's the area where the images are changing). The slider area have some buttons that could be added ti it like the zoom buttons and play/stop buttons, and the text panel.
Also, the themes could use some of the thumb panels available: strip thumbs panel and grid thumbs panel.
Each of the panels has it's own options, so if you using the theme that grid panel is available, only the grid panel options will be legitimate to it.
The gallery parts are on the image below:
Installing The Gallery
Installing the gallery is very easy.
Firs, you have to copy / upload the unitegallery plugin folder to your server, to the same folder where your page located.
Then add the following code to your <head> section of your page:
	<head>

	<!-- ... [OTHER INCLUDES] ... -->

		<script type='text/javascript' src='http://ajax.googleapis.com/ajax/libs/jquery/1.11.1/jquery.min.js'></script>
		<script type='text/javascript' src='unitegallery/js/unitegallery.min.js'></script>

		<link rel='stylesheet' href='unitegallery/css/unite-gallery.css' type='text/css' />
		<script type='text/javascript' src='unitegallery/themes/default/ug-theme-default.js'></script>
		<link rel='stylesheet' href='unitegallery/themes/default/ug-theme-default.css' type='text/css' />

	</head>
Then in the body put following gallery markup:
		<div id="gallery" style="display:none;">

			<img alt="Image 1 Title" src="thumbs/image1.jpg"
				data-image="images/image1.jpg"
				data-description="Image 1 Description">

			<img alt="Image 2 Title" src="thumbs/image2.jpg"
				data-image="images/image02.jpg"
				data-description="Image 2 Description">

		</div>
When:
- alt - image title (optional)
- src - url of the thumbnail image
- data-image - url of the big image.
- data-description - the description of the image (optional)
Then add following javascript code in order to initiate the gallery:
		<script type="text/javascript">

			jQuery(document).ready(function(){
				jQuery("#gallery").unitegallery();
			});

		</script>
Markup For Media Items
The gallery can play follwoing media items: Youtube, Vimeo, Html5 Video, Wistia, SoundCloud
For settnig up the videos please use following markup:
		<img alt="Youtube With Images"
			 data-type="youtube"
			 src="thumbs/youtube_thumb.jpg"
			 data-image="images/youtube_image.jpg"
			 data-videoid="A3PDXmYoF5U"
			 data-description="Youtube video description">

		<img alt="Youtube Without Images"
			 data-type="youtube"
			 data-videoid="A3PDXmYoF5U"
			 data-description="Youtube video description">

		<img alt="Vimeo Video"
			 data-type="vimeo"
			 src="thumbs/vimeo_thumb.jpg"
			 data-image="images/vimeo_image.jpg"
			 data-videoid="73234449"
			 data-description="Vimeo Video Description">

		<img alt="Html5 Video"
			 src="thumbs/html5_video_thumb.png"
			 data-type="html5video"
			 data-image="thumbs/html5_video_image.png"
			 data-videoogv="http://video-js.zencoder.com/oceans-clip.ogv"
			 data-videowebm="http://video-js.zencoder.com/oceans-clip.webm"
			 data-videomp4="http://video-js.zencoder.com/oceans-clip.mp4"
	    	 data-description="Html5 Video Description">

		<img alt="Wistia Video"
			 src="thumbs/wistia_thumb.jpg"
			 data-image="images/wistia_image.jpg"
			 data-videoid="9oedgxuciv"
			 data-description="Wistia video description!">

		<img alt="Sound Cloud Track"
			 src="thumbs/sound_cloud_thumb.jpg"
			 data-type="soundcloud"
			 data-image="images/sound_cloud_image.jpg"
			 data-trackid="8390970"
			 data-description="SoundCloud track description">
When:
* For Youtube items the thumb and big images are not a must. If some of them is missing, the script will fill it from the youtube website.
Changing Skin
Changing skin is very easy. First, you have to include the skin css (from skins folder of the gallery). Now tere is one additional skin for example: "alexis" skin, but you can add your skin simply by copying the alexis skin to another folder, rename it and change the graphical elements.
	<head>

	[...other includes...]

		<link rel='stylesheet' 	href='unitegallery/skins/alexis/alexis.css' type='text/css' />

	</head>
Then you have to choose what item skin you want to change. You can change every slider graphical item (all the buttons, bullets, arrows) that you have in options, grid arrows and handles. Also you can add every gallery element design that you want like gallery global wrapper css or slider css.
Also, you have global skin option (gallery_skin) that change all the skinnable elements (like global default setting).
Please see options below.
	jQuery("gallery").unitegallery({

		gallery_skin:"alexis"				//it's the default skin
		slider_bullets_skin: "alexis"		//example how to change only skin for slider bullets

	});
Changing Theme
The themes located under unitegallery / themes folder.
For changing the theme you have to add it's javascript in "head" section of the page, and css of the theme then if available.
	<head>

	[...other includes...]

		<script type='text/javascript' src='unitegallery/themes/compact/ug-theme-compact.js'></script>

	</head>
after that in the javascript you need to change option: gallery_theme:"theme name" as you see in the folder.
Each theme has it's own options in addition to global gallery options. All the options you can see in theme pages in the unitegallery.net website.
	jQuery("gallery").unitegallery({

		gallery_theme:"compact"		//example how to change skin to "compact"

	});
* Note, that some theme has it's own graphical elements like "default theme", and you can't change some of them, only to disable it and add them from the "slider" options. Like slider play button and fullscreen buttons in "default" theme. It's controlled from theme options and not from the slider options, so it's not skinnable, and slider options don't related to them.
* Note, that if you include only one theme per gallery page (example load only copmact skin js and remove the default theme js, then you don't have to use "gallery_theme" option. It will be loaded automatically.
Using The API
Using gallery API is very easy. You have some functions that can control the gallery functions and some events that happends on gallery states change.
First, you have to create the API variable in the javascript of the gallery creation:
* note that the api variable has to be external, outside of the ready() function.
		<script type="text/javascript">
			var api;
			jQuery(document).ready(function(){
				api = jQuery("#gallery").unitegallery();
			});

		</script>
Then you can use the API variable in every javascript functions that you have and integrate. Below there is the functions that you can use arranged as javascript functions so you can copy / paste from the code window and use them in your code:
			api.play()					//start play mode
			api.stop()					//stop play mode
			api.togglePlay()			//toggle play mode
			api.enterFullscreen()		//enter fullscreen
			api.exitFullscreen()		//exit fullscreen
			api.toggleFullscreen()		//toggle fullscreen
			api.zoomIn()				//zoom in current image
			api.zoomOut()				//zoom out current image
			api.resetZoom()				//reset zoom to fit zoom mode
			api.nextItem()				//next item
			api.prevItem()				//previous item
			api.selectItem(numItem)		//go to some item by index (0-numItems)
			api.resize(width, height)	//resize the gallery to some width. Height is optionary.
			api.getItem(numItem)		//get data object of the item by some index.
			api.getNumItems()			//get number of items in the gallery
Also, there is API events on some gallery functionality that you can use. You can copy / paste the events code from the javascript code window and use it:
			api.on("item_change",function(num, data){		//on item change, get item number and item data
				//do something
			});

			api.on("resize",function(){				//on gallery resize
				//do something
			});

			api.on("enter_fullscreen",function(){	//on enter fullscreen
				//do something
			});

			api.on("exit_fullscreen",function(){	//on exit fulscreen
				//do something
			});

			api.on("play",function(){				//on start playing
				//do something
			});

			api.on("stop",function(){				//on stop playing
				//do something
			});

			api.on("pause",function(){				//on pause playing
				//do something
			});

			api.on("continue",function(){			//on continue playing
				//do something
			});
On some events and functions there is a item data object. It's fields are described below:
Note, that you can add additional data to the items as item data field, like: <img src="thumbs/thumb1.jpg" data-yourfield="yourvalue" ...> . Then you'll get that field in the data object together with other fields.
		data.index
		data.title
		data.description
		data.urlImage
		data.urlThumb

		//that taken from <img... data-custom="value" ... > from gallery markup

		data.custom 	//item custom field passed.